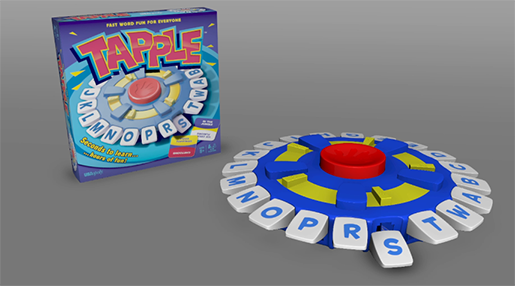
A few weeks ago I got my first "real freelance gig" doing 3D work on a commercial for the board game Tapple. I thought I'd take the opportunity to share the work I did, along with the process I went through to create the shot.
Modeling
I'm not the world's greatest 3D modeler, so thankfully this part wasn't too bad. I was given a copy of the game, so I started by taking measurements of all the pieces with a ruler. I ended up modeling the insides of the board (you can't really see it in the shot), as well as the flaps on the cardboard box. Turns out I didn't need quite that level of detail, but I decided early on that I'd rather not enjoy having to re-model everything if the client wanted a different shot than the rough layout that I had made.
Speaking of rough layout, Maya's viewport 2.0 is great. I won't post the layout video because it's pretty much identical to the final render in terms of motion, but here's a screenshot:
I went through a few iterations of layout to get the animation timing and camera movement down, and using VP2.0 was super helpful.
Animation
The client asked for a very straightforward animation.
There's 2 button presses and then a box falling down, the timing of which will match a voiceover in the commercial. To get the animation of the falling box to look right, I did a rigidbody simulation of a proxy box that was the same dimensions as the box model you see in the shot and gave it a lot of mass and fairly high gravity. I wanted finer control over how the simulation ran though, so I converted the dynamic sim to keyframes and cleaned those up in the graph editor. The dynamic sim started out looking a little too floaty, so adjusting keyframes allowed me to really give the box a feeling of impact when it hit the ground.
Rendering
Once the animation was done it was time for materials and rendering. At this point I am finally in my comfort zone, so knocking out a few types of plastic was quick work.
I took a few pictures on my phone to get the letters on the keys of the board, and that was the only photo file I had to create (minus the box, I got those images from the client and didn't have to make them).
Lighting in a cyc environment like this is more challenging than it might seem at first. There's nothing too complicated going on, however reflective materials like metal, plastic, glass and such only look as good as the environment that they are reflecting. In a real-world photoshoot, they will have studio lights surrounding the product, as well as the environment and the camera. All of these things are reflected in the plastic, so without any geometry in the shot to reflect, things are going to look dull and unrealistic. Luckily, HDR images exist, and that's exactly how I tackled this problem.
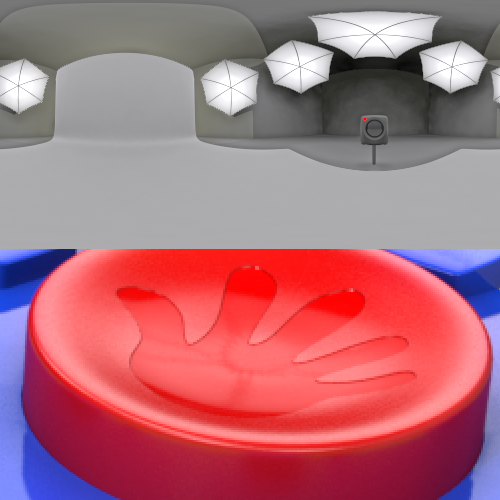
You can see how the environment (top) is reflected in the plastic (bottom). Nobody will really notice this when they're looking at it, but the absence of these details will be immediately noticeable and your audience will say things like “it doesn't look quite right”, or “it seems too CG”. A strong HDRI contribution allowed for 1-realistic lighting from the global illumination and 2-an environment for the plastic to reflect.
90% of the lighting is coming from the environment light in this shot, with a few specific linked lights for some shadows, fill, and rim lighting on the box and board.
Compositing
I love me some render passes; I think I used 8 in this shot.
The more render passes you have, the easier it is to edit things in comp, rather than having to re-render the shot (and this shot took ~50 hours to render on my poor computer). Also, if you DO have to re-render, you probably only have to do a couple of the layers rather than the entire shot.
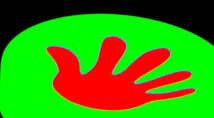
Another fun trick is to render RGB mattes of different things you know you'll be color correcting. I wanted to make sure that the button was really vibrant, for example, and that the handprint really stood out. So I separated the exterior of the button (green), the interior (red), and the beveled rim (blue – difficult to see, but it's there). This let me darken the bevel a little bit and punch up the reflection on the glossy interior without spending a ton of time doing hacky render tricks in Maya.
Having all of this control really let me get the color levels I wanted, along with absolute control over the shadows to really have a high range of brightness values. Topping it all off, I added some bloom to the board to make it prettier and add a little flair to it. What can I say, I probably watch too many Disney movies. Here's how I built the comp:

And that’s that!
The animation was done for the Herbert Brothers in Batesville, IN.